Authors: Aleks Penev, MD PhD & Desiree Marshall MD
An important first step in neuropathologic autopsy (and in general) is to review the autopsy consent and take into account special requests and permissions given by family and next-of-kin where possible.
Of note, an excellent video tutorial on neuroanatomy using whole autopsy brains is available HERE.

REMOVAL OF NEUROLOGICAL TISSUES
Brain
The following instructions can be viewed as a video HERE. Although the video is dated, the procedure is still accurate with two minor deviations noted below.
- Start with the body turned face up – a neck block can sometimes be helpful to elevate the head – and incise the scalp along the coronal plane stretching from ear to ear (specifically pinna to pinna).
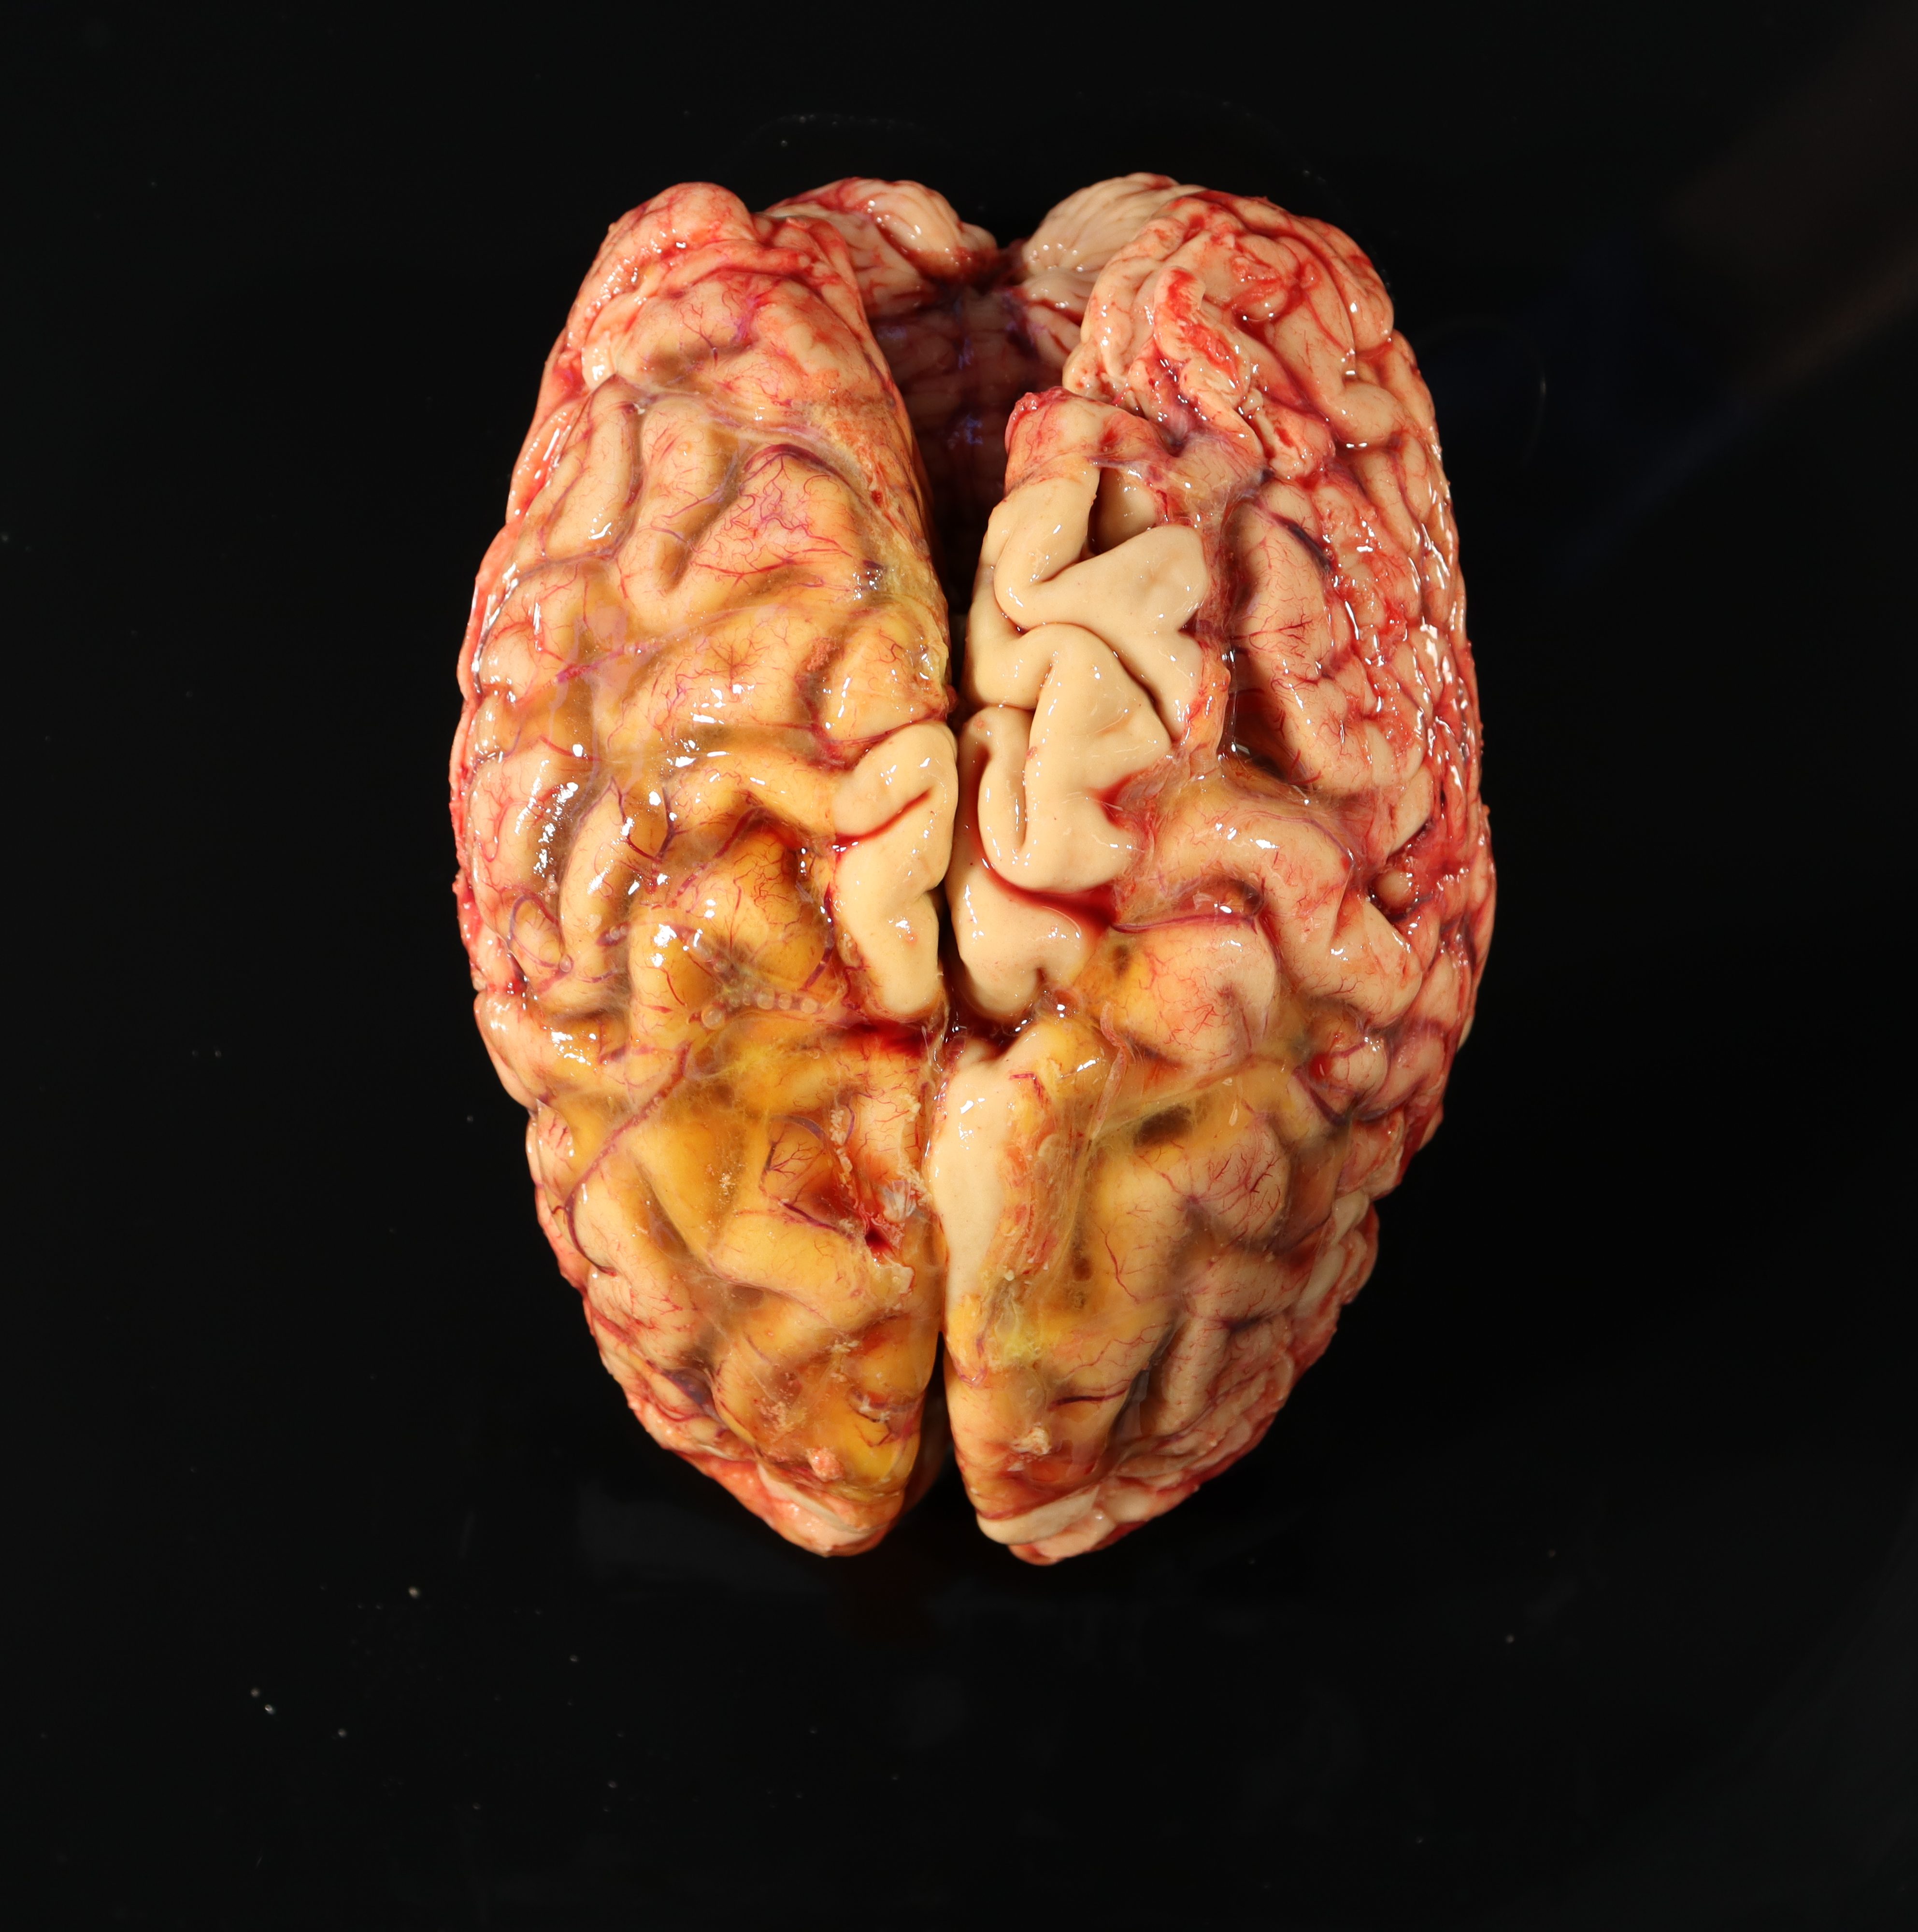
- Free the scalp from the skull and reflect it forward up to the supraorbital ridges (just above the eyebrows) and backwards to the external occipital protuberance (the bump at the posterior base of the skull).
- Use an electrical saw to open the cranial cavity circumferentially.
 Image: There are different recommended locations to make these cuts, however it is often useful to cut the frontal bone above supraorbital ridge in the axial plane and extend that cut bilaterally in the same plane until the mid-temporal bone. Then create a short cut (1-2 cm) at an angle oriented inferiorly and anteriorly (creating a roughly 60–80-degree angle below the first cut. Then continue to cut posteriorly bilaterally in the horizontal (axial) plane to meet just above the bottom of the occipital bone. This creates a “shelf” that makes reapproximating the cranial bones easier at the conclusion of the autopsy. (This is not demonstrated in the video). (Image credit: Meagan Chambers/Stanford Hospital).
-
- Once cut, apply firm traction to the skull cap from front to back by inserting a wedge into the center of the opening in the frontal bone. The dura should remain intact, though it is often the case that the dura is incised during the cutting of the skull bones. If this is the case, the dura can be peeled off for examination.
- In older individuals, the dura will often be adherent to the skull and will detach when the skull cap is removed. It is best to strip the dura in this case and it will often come away piecemeal, which is acceptable. (This is not shown in the video. In contrast, the video opens the dural sinuses in situ. But it is recommended to remove the dura for further examination).
- Incise the dura longitudinally (approximately 2 cm lateral to the midline) on either side from back to front. Then make a semicircular incision along the bone’s cut edge to separate the dura’s superior portion.
- Incise the anterior attachment of the falx cerebri down to the crista galli.
- Lift the olfactory bulbs off the base of the skull using gentle dissection as they are easy to transect.
- Gently lift the frontal lobes and free them gradually, moving from front to back, using either scissors or scalpel to separate from the anterior connecting structures including optic nerve, internal carotid arteries and pituitary stalk.
- Incise the tentorium cerebelli (dividing membrane that separates cerebellum from cerebrum) along the outer edge of its attachment to the petrous bone
- Support the brain with one hand while tilting it backwards and cut through the posterior connecting structures, including cranial nerves and vertebral arteries, staying as close to the bone as possible.
- While continuing to support the brain with one hand, “deliver” the brain:
- If the spinal cord has not already been removed, insert a long thin scalpel into the foramen magnum to transect as far inferiorly as possible to free the medulla.
- Place the other hand with the palm on the ventral surface of the pons and insert middle finger to the left and index finger to the right of the medulla and “deliver” the cut end of the medulla by pulling gently.
- Then insert two fingers under each cerebellar hemisphere to free them and incise the dura of the posterior fossa to completely free the brain.
- Once cut, apply firm traction to the skull cap from front to back by inserting a wedge into the center of the opening in the frontal bone. The dura should remain intact, though it is often the case that the dura is incised during the cutting of the skull bones. If this is the case, the dura can be peeled off for examination.
- Weigh the brain
Note: If infectious workup with cultures is indicated, swabs and fluid collection must occur on fresh tissue (prior to exposure to formalin). See the meningitis article for additional information on ancillary (especially infectious) testing.
- “Hang” the brain by looping a length of string under the basilar artery and immerse the brain in 5-6 liters (on average) of 10% neutral (calcium) formalin in a container large enough for the brain to float freely without contacting the sides or bottom (this prevents distortions postmortem during fixation) with the base facing the surface.
- For soft brains, or if the basilar artery was disrupted during removal, it will often be useful to place the brain inverted in a bouffant cap or similar thin disposable sheet, and then string through the bag in order to hang and preserve the shape.
- Recommended fixation time is typically between 2-3 weeks and the specimen can be stored indefinitely given appropriate storage (to prevent evaporation) and regular changing of formalin. However, the brain can also be cut fresh to expedite the return of the body and organs.
Spine
The spine can be removed via a posterior or anterior approach. The anterior approach is typically used in adult cases where the organ block has been already removed, and the posterior approach is often preferred in pediatric cases. For images of the anterior removal, see this site.
Anterior approach
- Expose the vertebral bodies and use an electric saw to cut the vertebral peduncles horizontally along the length of the spine.
- The costo-vertebral junction can be a good landmark to aim for when removing the bodies in order to avoid cutting too shallow.
- Lift the interconnected vertebral bodies away from the cord.
- Transect the rostral end of the cord as superiorly as possible with a scalpel. Remove the cord by lifting the dura at each vertebral level and use sharp dissection to cut the spinal nerve roots and dorsal root ganglia proceeding downward to the cauda equina.
Note: Only grip the tough dura to avoid damaging the very soft cord.
Posterior approach
- With the body face down, incise the skin and soft tissue along the spinous processes from the external occipital protuberance to the base of the sacrum.
- Free the soft tissue using a knife and a scraper to expose the vertebral laminae on either side of the spinous processes.
- Angling the blade of the saw to orient the cut as far laterally from the posterior spinous processes, section the vertebral laminae bilaterally along the length of the spine. At this point, all the spinous processes and the connecting tendinous aponeuroses can be lifted off in one piece.
- Transect the rostral end of the cord as superiorly as possible with a scalpel. Remove the cord by lifting the dura at each vertebral level and use sharp dissection to cut the spinal nerve roots and dorsal root ganglia proceeding downward to the cauda equina.

 Images: low power and medium power of a spinal cord cross section showing “toothpaste artifact” – where there has been central herniation of white matter down the central portion of the spinal cord, displacing the grey matter to a thin rim at the margin. This is a consequence of squeezing the cord on removal. (Image credits: Kyle Dyson/Stanford Hospital).
MACROSCOPIC EVALUATION
It is often useful to start by measuring the weight of the brain post-fixation.
The following instructions are also demonstrated in a video HERE.
- Examine the detached portions of dura, looking for areas of coagulated blood, blood-staining, neo-membranes or masses/nodules. Be sure to section the sagittal and transverse sinuses in cross-sections to assess for venous sinus thromboses or other causes of obstruction.
- Examine the external surface of the brain for any asymmetries, areas of softened texture, or discoloration. Identify and note the condition of cranial nerves when possible. Note if the cerebral vessels are congested or if there is atherosclerosis in the circle of Willis.
- Generally, atherosclerosis distribution is graded based on the location of the plaque: mild distribution is any plaques proximal to the first branch of the ACA, MCA or PCA; moderate distribution is located between the first and second major branch points and and severe distribution is any plaque in the smaller distal segments.
- Each plaque should be sectioned to determine the level of occlusion of the vessel.
- Note if there is any evidence of atrophy, with increased space within sulci between gyri (atrophy can also correlate with lower brain weight for size of the individual).
- Determine if any herniation is present by checking the following areas for a discrete depression or “shelf” and then measuring the depth of any impressions seen on the affected and unaffected sides. For additional information see the Herniations Article.
- Tonsillar herniation – examine the cerebellar tonsils on the inferior aspect of the cerebellum adjacent to the brainstem – herniation in this area is measured on the superior-inferior axis.
- Uncal herniation – examine the inferior medial surfaces of the temporal lobes (adjacent to the uncus) – herniation in this area is measured on the medial-lateral axis
Subfalcine herniation – examine the surface of the central fissure for any depressions caused by tissue pushed up against and under the falx in the midline – hernations in his location are measured on the medial-lateral axis. The hemispheres can be gently separated to view any tissue obstructing the view of the corpus callosum. Alternatively, this can be visualized in cross section.

Image: Illustration of the different types of herniation. (Image credit: Wikipedia).
Note: Adult brains have a normal “physiologic” shelf, or degree of uncinate process protruding medial to the groove of the tentorium; look for discoloration, hemorrhage, and softening to identified true herniation changes.
- Remove attached leptomeninges from the bottom surface of the brain (interpeduncular fossa), revealing structures like the mamillary bodies.
- Separate the posterior fossa structures (cerebellum, midbrain, pons and medulla) from the rest of the brain by cutting through the rostral part of the cerebral peduncles with a scalpel along a plane parallel to the base of the brain. Often it is easy to position your scalpel by placing the flat side of the blade against the mamillary bodies with the tip pointed towards the brainstem and making bilateral incisions through the cerebral peduncles at that level. Keep the blade course as even and “perpendicular” to the brainstem as possible and avoid “scooping” upward as you cut toward the lateral edges of the peduncles It is often useful to weigh the posterior fossa structures separately.
- It is usually possible to identify the pineal gland in the quadrigeminal cistern at this stage.
- Place the brain down on a cutting board on the convexity (i.e., base facing up) and make the first coronal cut through the mamillary bodies.
- Good note: a long, sharp blade is best; cut using the entire length of the blade as if drawing a violin bow to yield smooth cut surfaces (i.e., no “sawing” back and forth)
- Make all subsequent cuts in the coronal plane by placing the first cut surface face down on the board and then cutting parallel to the board, aiming to produce slices approximately 1 cm thick, until the entire specimen is sectioned from frontal to occipital poles.
- It is easiest to arrange the slices on an examination board as you make your cuts, from anterior to posterior with the left side of the brain to the left of the board.
- With the slices arranged, make note of any asymmetries, lesions (which may either appear hemorrhagic or softened) or areas where the grey-white matter junction is indistinct.
- Assess for atrophy by noting the diameter of the horns of the lateral ventricles in the temporal lobe at the level of the genu and also if there is posterior elongation of the lateral ventricles into the occipital lobe. There can also be increased space between gyri as can be seen on the cortical surface.
Prior to cutting the posterior fossa structures, it is often useful to score either the left or right side of the ventral brainstem. The cerebellum can then typically be cut in two ways depending on preference:
- Without separating the cerebellar hemispheres, make the first cut through the pontomedullary junction and widest point of cerebellar hemispheres; this provides to flat surfaces to cut from and limits tangential sectioning
- take horizontal (axial) sections starting at the cerebral peduncles and extending down to the medulla, with slices no more than 1 cm thick and arrange the slices on an examination board.
- Alternatively, the cerebellar hemispheres can be separated from the brainstem by cutting through the cerebellar peduncles. The first cut separates the cerebellar hemispheres by cutting through the cerebellar vermis in the sagittal plane at the midline. The rest of the cerebellum is sectioned parallel to this sagittal plane. The remaining brainstem portion is sectioned transversely as above.
- It can often be easier to identify and cut the cerebellar peduncles if you hemisect the cerebellum at the vermis first.
- A combination approach is also possible, where one cerebellar hemisphere is removed (we often remove the right) and is sectioned in the sagittal plane and the remaining hemisphere and brainstem structures are transversely sectioned in the axial plane.
The spine (if taken) is then sectioned transversely after opening the dura (this can be done either anteriorly, posteriorly or both).
Example of institutional standard sections:
- A1: Pituitary gland; pineal gland
- A2: Bilateral superior-middle frontal gyri with connecting sulcus, bilateral (left incised)
- A3: Bilateral basal ganglia, bilateral (left side scored)
- A4: Bilateral hippocampus, bilateral (left side scored)
- A5: Bilateral thalamus, bilateral (left side scored)
- A6: Bilateral calcarine cortex, bilateral (left side scored)
- A7: Midbrain (left side scored)
- A8: Pons (left side scored)
- A9: Medulla, upper and lower (left side scored)
- A10: Medulla (left side scored)
- A***: Additional sections are added to evaluate identified lesions as well as spinal cord sections when present.
Extended panel for any decedent aged 65+ for neurodegenerative disease screening (Flanagan 2017):
- E1: Cerebellar cortex; right neostriatum; right calcarine cortex; midbrain with substantia nigra and periaqueductal gray. This slide is then used with amyloid-beta IHC to determine Thal phase.
- E2: Right hippocampus; right sup. frontal gyrus; right sup. temporal gyrus; (score x2), left calcarine cortex (score x1). This slide is then used with p-Tau IHC to determine the Braak stage.
- E3: Left hippocampus; left sup. frontal gyrus (score x1); left sup. temporal gyrus (score x2), right inf. parietal lobule. This slide is then used with Bielschowsky’s silver stain to determine CERAD score.
- E4: Amygdala; cingulate gyrus; left inf. parietal lobule (score x1); pons with locus ceruleus. This slide is then used with alpha-synuclein IHC to evaluate for Lewy Body disease.
- E5: Left neostriatum; right thalamus; left thalamus (score x1); medulla. This slide is only H&E stained initially but can aid in evaluation of Lewy Body disease.
References:
- Adle-Biassette H. & Mikol J. Brief Survey of Neuropathological Techniques. In Escourolle & Poirier’s Manual of Basic Neuropathology, 2019. Oxford University Press, 6th edition.
- Flanagan ME, Marshall DA, Shofer JB, et al. Performance of a Condensed Protocol That Reduces Effort and Cost of NIA-AA Guidelines for Neuropathologic Assessment of Alzheimer Disease. J Neuropathol Exp Neurol. 2017;76(1):39-43. doi:10.1093/jnen/nlw104
- Blevins BL, Vinters HV, Love S, Wilcock DM, Grinberg LT, Schneider JA, Kalaria RN, Katsumata Y, Gold BT, Wang DJJ, Ma SJ, Shade LMP, Fardo DW, Hartz AMS, Jicha GA, Nelson KB, Magaki SD, Schmitt FA, Teylan MA, Ighodaro ET, Phe P, Abner EL, Cykowski MD, Van Eldik LJ, Nelson PT. Brain arteriolosclerosis. Acta Neuropathol. 2021 Jan;141(1):1-24. doi: 10.1007/s00401-020-02235-6. Epub 2020 Oct 24. PMID: 33098484; PMCID: PMC8503820.


